Defender, Chapter 8: Catching Humanoids

All Defender players know how to catch falling men – when a lander is carrying one of the little guys away, you can just shoot the lander and then intercept the man before he hits the ground. The key word, however, is can. Just because you can catch a falling man doesn’t mean you should, and knowing when to catch them and when not to is as important as knowing how.
When to try
During the first four waves, go ahead and catch all the men you can. It’s good practice, and the game is slow enough at this point that losing a few seconds here and there won’t hurt anything. Later in the game, don’t go out of your way to catch a man unless he is your last one or only a few landers are left. Otherwise, the time it takes to catch him could cost you one or more men elsewhere on the planet.
When you shoot the lander that is carrying a man away, you’re not under any obligation to save the man. If it looks like you’ll get blown up trying to catch him, just keep going. Staying alive wins more games of Defender than compassion or sympathy; in the world of Defender, a man is worth far less than the ship that carries him.
The only time you should endanger yourself to catch a man is when your last man is going up. In this case you must commit yourself to catching him, even if you die in the attempt. In fact, if you miss the catch, you should try to get blown up, unless you’re very good at free space. Dying while your last man is falling keeps you out of free space, and your next turn starts with him back on the ground. Of course, if you have been paying attention to the wave number and know that you’ll be getting men on the next wave, you can just let the man go up. One wave of free space isn’t worth losing a turn over, even if you have trouble with free space.
A successful catch
Once you have decided to catch a falling man, try to get under him and move upward. This decreases the chance of a miss. Also, you must stop firing during the catch; if you’re firing during the catch, the man will be destroyed.
There are two sure signs of a successful catch. If your eyes are on the main screen, watch for the flash blue, yellow, and red 500 that appears next to your ship. If you’re watching the radar screen, listen for the distinct sound of a successful catch. These signs are both more reliable than simply watching for the intersection of you ship’s path and the man’s trajectory; it’s possible for your ship to touch the man without actually catching him.
Shooting the lander
When you see a man going up (on the radar screen), try to be lined up with the lander before he comes onto the main screen. You should shoot him from as far away as possible; landers shoot more when they’re carrying me, so getting too close is dangerous. Ideally, your shots should leave your ship before the lander is even on the screen, and the forward motion of the screen will bring the shots to him. This way the lander will fire no shots at all, because he’s dead the instant he appears on the screen.
When shooting the lander that is carrying a man, never strafe upwards, because your shots will kill the man if you start firing too low. Strafe downwards, and stop shooting as soon as you see a shot hit the lander.
Beginning players often shoot the lander that is carrying a man away by holding a steady altitude somewhere above him and firing constantly, allowing the lander’s vertical motion to bring him into their line of fire. This is a good approach to use if you haven’t developed the accuracy to hit a moving lander with one or two shots. There is, however, one place where it doesn’t work. If you hold your ship against the top of the screen and fire constantly, the lander and man can mutate without crossing your line of fire – they become a mutant just before reaching the top of the screen. Your last chance to shoot a lander, then, occurs at an altitude about half an inch below the topic of the screen. This is the highest point where waiting and firing will work.
If the machine is very busy and has slowed down, your shots will take longer to get to the lander than you’re used to. Consequently, the lander may have moved upward far enough to pull the man into your line of fire by the time the shots get there. When the machine is busy, allow an extra margin of safety by shooting above the lander and waiting to see if he moves into your shots by the time they reach him.
Sometimes, when the machine is extremely busy, the lander and man will pass right through the top of the screen and start coming up from the bottom again. If your last man is going up when this happens, you get another chance to save him. Although using a smart bomb on many opponents can slow the machine down – and perhaps cause the lander and man to go through the top of the screen – this usually happens only accidentally. To intentionally try to slow the machine, in the hope that the man will go through the top, is a very unreliable trick, but it’s worth a try if you’re just experimenting or showing off.
Multiple catches
When more than one man is going up on the main screen, you can either catch the closest one and take off or try to catch all of them. If you’re going to catch all of them, shoot the highest lander first. This give you more time to work on the others, because the man will be falling longer. If two or more landers are carrying men up together, shoot all of the landers before trying for a catch. Otherwise, one of them could mutate and kill you while you’re trying to catch the falling man.
Smart bomb catches
Although it isn’t possible to shoot a lander once he is in the top half inch of the screen, you can still stop him with a bomb. If you are rushing to your last man, who is going up, use a bomb to destroy the lander if he is very close to the top of the screen. After the lander and man come onto the screen, hit the bomb and power brake during the catch. That way, if you miss the catch your forward momentum won’t carry your ship too far beyond the falling man to get back to him in time.
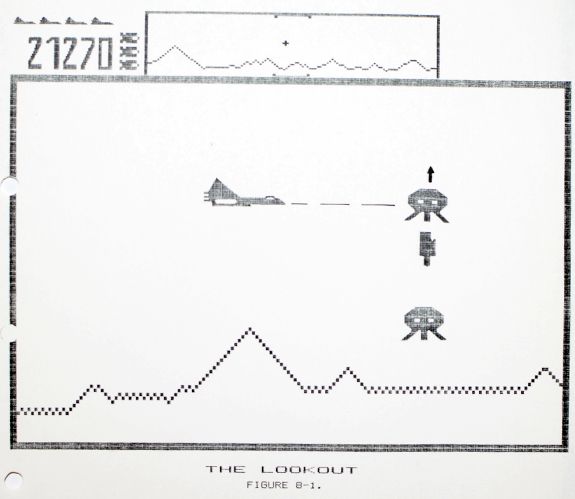
The lookout
Sometimes a lander will carry a man away while another lander stands lookout, waiting over the spot where the man was picked up. This presents a problem, because you can easily run into the lookout while trying to catch the man. There are two solutions that work well.
The first is to wait until the lander carrying the man is very far up the screen before shooting him. Then you will have time to shoot the lookout before the man has fallen down to his altitude and you’ll have an unobstructed catch. By stopping directly underneath the man, at the lookout’s position, you may even have time to shoot a few landers before the man falls all of the way down to your ship.
The second solution is used if you shoot the lander carrying the man at too low of an altitude to allow a safe catch above the lookout. It also provides a way out if you try the first method and then miss the lookout. Just catch the man below the lookout. There is always a small gap between the lookout and the terrain, and it’s big enough for your ship to pass through. By waiting in that small opening, you can catch a falling man immediately after he passes through the lookout. The lookout seldom shoots straight down, so the biggest danger in this maneuver is that you may have developed a habit of moving up when catching a man – a good habit when there’s plenty of room, but a very self-destructive habit in this context. Smashing into the lookout a few times out to cure it, though.
There’s another way to handle the lookout, but it’s very risky and difficult. When the man is falling through the lookout, you can shoot the lookout with a single shot that destroys him but lets the man survive. You then must catch the man almost immediately, or he will hit the ground. This means that you have to be moving quickly, at the lookout’s altitude, and fire exactly one shot just before you run into the lookout. If your shot misses, you run into the lookout and blow up. Even if your shot is good, there’s a chance you’ll miss the man because of the speed at which you’re traveling. The only time this maneuver is worth trying is when you try the first method, miss the lookout, and then can’t try the second method because of a bomber, swarmer, or baiter in the opening under the lookout. Even then, a smart bomb is probably the best way to go.
Dealing with swarmers
Catching a falling man is even more difficult when there are swarmers on the screen. These catches can be made much easier by planning out where you want the swarmers to be during the catch, rather than leaving it to chance. One approach is to use the swarmer follow move to chase the swarmers away while the man is going up. If you don’t get too far away, you’ll have time to turn around and catch the man, with the swarmers following just off the screen behind you. If the man is near the swarmer reverse line, just chase the swarmers over the line and you won’t have to worry about them at all.
If a cloud of swarmers is approaching from the other side of a man going up, you probably won’t have time to use the follow move to chase them away. In this case, try to shoot the lander as quickly as possible. When the swarmers come on the screen, don’t try to shoot any of them, since you could accidentally shoot the falling man. Just fly through the swarmers, avoiding their bullets, and catch the man. If there are so many swarmers in the cloud that they’re hypering as they come onto the screen, the catch will slow down the machine enough to hyper some of the swarmers away and possibly create an opening to fly away through. For this reason, a catch in the midst of ten swarmers is often easier than a catch in the midst of two or three.
Since flying through a cloud of swarmers is very difficult, it is often better to try to fly around them. Flying below them is best, because you will come out in a good position to move up to the catch. If the swarmers are low on the screen, move upwards first, to draw them towards the top of the screen, and then cut underneath them to catch the man.
Hyperspace
Sometimes, when committed to a catch (usually your last man), you will be able to tell that, even if the catch is successful, you won’t survive. Don’t forget about hyperspace in these situations. As soon as you hear the sound of a successful catch, you can hyperspace and bring your passenger with you.
Setting him down
However you catch a falling man, try to set him down in a low area in the terrain. If you set him on top of a hill, it’s easy to accidentally shoot him the next time around. Also, remember to stop shooting at the instant you set a man down or you’ll kill him. If you’re coasting backwards when you set a man down, you must stop shooting until you’ve reversed again or pulled away from him; otherwise you’ll shoot him as soon as he disembarks.
Negligent homicide
Although it’s easy to see how you could accidentally shoot a man after setting him down, it isn’t so clear how you can shoot a man while you’re still carrying him. This does happen occasionally, however, much to the chagrin of poor free space players carrying their last man. It will only happen when the machine is very busy and you fire while coasting backwards or moving down rapidly. The man hanging off your ship can’t quite keep up in these situations, and you shoot him when he falls behind.
- About this book
- Introduction
- Chapter 1: Getting Started
- Chapter 2: The Controls
- Chapter 3: Landers
- Chapter 4: Mutants
- Chapter 5: Swarmers
- Chapter 6: Bombers
- Chapter 7: Baiters
- Chapter 8: Catching Humanoids
- Chapter 9: Free Space
- Chapter 10: Strategy
- Chapter 11: Miscellaneous
- Chapter 12: Stargate
- Chapter 13: Attitude
- Acknowledgments