Defender, Chapter 7: Baiters

Baiters are Defender’s most challenging opponent. As the game’s policemen, they appear when you take too long to finish a wave. This is enough incentive to make any player finish waves as quickly as possible, but even the quickest player will have to deal with an occasional baiter.
Discussing tactics for shooting baiters is more difficult than discussing any other opponents in the game of Defender for two reasons. First, there is a random element in baiter behavior – two baiters in exactly the same situation won’t do exactly the same thing. Second, and even more important, most players get so nervous and excited when a baiter appears that they have trouble thinking clearly. As the game’s most formidable opponent, baiters have a psychological edge over most players. To help you overcome this advantage, let’s take an analytical look at how baiters think, and expose them for the simple-minded bullies they are.
The brain of the baiter
Baiters are what Defender’s inventor, Eugene Jarvis, calls a relative enemy. This is because a baiter’s motion is always calculated relative to your ship’s motion. It makes no difference whether your ship is moving or standing still; the baiter will simply add your velocity to his own, and to him you appear to never be moving. This is why you can never outrun a baiter.
Another aspect of baiter behavior is the concept that computer people call a sampling rate. Because of hardware limitations, it would be very difficult to design a game in which all of the opponents know where your ship is all of the time. This is particularly true in a game like Defender, where there can be dozens of active opponents at any one time. To get around this problem, each of the opponents samples your ship’s position periodically. This is the so-called sampling rate, and for baiters it works out to three or four times per second.
So what does this mean? Simply put, it means that a baiter only sees you about three times each second. In between these times, he remembers where you were when he saw you last. If you’ve moved since the last time the baiter saw you, he won’t know exactly where you are.
Remember, though, that baiters are a relative enemy – they will add your speed to their own. To move relative to the baiter, then, your speed must change. If you’re moving at a constant speed, the baiter will always know where you are, because he’s moving at that same speed and you appear to be standing still.
A random element in baiter behavior comes into play each time a baiter looks at you. After determining where you are, the baiter randomly decides whether to try to run into you or just sit still for a while longer. This is what makes him unpredictable – even if he has an opportunity to run into you, the baiter may not take it. In fact, a baiter that is very close to you will never try to run into you if you don’t move. Of course, he won’t have much trouble shooting you at that range.
When baiters will appear
If you play Defender machines with identical settings often enough, you’ll soon be able to predict fairly accurately when a baiter is going to appear. There are three things that determine when baiters begin appearing in a wave: how long since the wave began, how many opponents are left in the wave, and the machine settings. The more time, fewer opponents, or higher settings, the more likely a baiter will appear.
Although the rate at which time passes and the machine’s settings are probably beyond your control, you can do something about the number of opponents left in the wave if you have leftover pods. Breaking a pod will change that one opponent into up to seven opponents, and buy some time before the baiter appears.
Anticipation
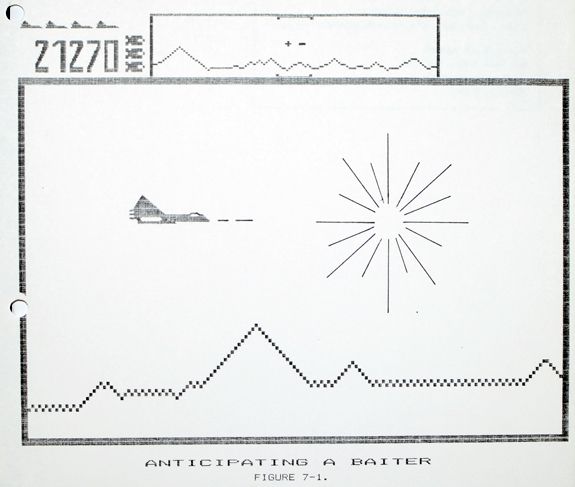
Well, that’s more than enough theory. What we need now are some practical solutions to common predicaments involving baiters. The first tip for shooting baiters is just to shoot them as soon as they appear. It’s actually possible to shoot a baiter at the instant he materializes on the screen, because there are two clues that show you where a baiter is about to appear. When you hear the whooshing sound of the baiter beaming in, watch either the main screen or the radar scanner closely. If you’re watching the main screen, you will see a starburst of light converging where the baiter is about to appear. On the radar scanner, the baiter’s position will be shown by a bright green dot that appears even before he beams in on the main screen. By lining up your ship with either the green dot on the scanner or the center of the starburst on the main screen, you will be in position to shoot the baiter as soon as he appears. If this maneuver is done correctly, you might not even see the baiter appear on the main screen – the whoosh of him beaming in will abruptly end with the sounds of him getting shot and exploding.
Finishing the wave
Sometimes the presence of other opponents on the screen will prevent you from moving into position to shoot the baiter right away. Or your first shot could miss. In either case, you now have a baiter on the screen with you. The next decision you need to make is not how to shoot him, but whether or not you need to. If there are only one or two opponents left in the current attack wave, finishing the wave may be easier than trying to shoot the baiter.
To do this, you’ll need to ignore the baiter, and this is unnecessarily difficult for most players. Ignoring the baiter is not difficult, once you decide that is what you’re doing. The way most players get in trouble is that they try to ignore the baiter, but keep an eye out for the chance to shoot him. If you’re ignoring baiters, ignore them. If it helps you any, think of the baiter as just one more member of the attack wave – the one you’re saving for last. And if you always save the baiter for last, you’ll never have to shoot him.
The slingshot
If you’ve decided that a particular baiter has to go, try to confuse him by quickly reversing twice while moving. Sometimes the baiter, who has been adding your speed to his own, will miss the reverses and just keep on going. When this happens, the baiter flies far out in front of your ship and can easily be shot. This is the slingshot maneuver.
The overshot
Another good opportunity for shooting baiters occurs when you’re flying very fast with a baiter traveling just above or below your ship. If you see the baiter start to make his move towards your ship, let off the thrust. If the baiter doesn’t sample your position immediately after you let off the thrust, he will move directly in front of your ship, before he realizes his mistake.
Getting out of the squeeze play
One of the most common problems that players have with baiters is getting pinned against the top or bottom edge of the screen. When this happens, it is almost always because the player was trying to outrun the baiter – a feat we already know is impossible.
If a baiter is forcing you against the edge of the screen, just turn around. Either the baiter will react to your reverse, or he’ll keep going. If he reacts, usually by slowing down, you can try to pull in front of him and then away from the edge of the screen. If he ignores your change of direction, you can pull around behind him and away from the edge of the screen. Try to recognize the squeeze play as early as possible, so you’ll have time to get out of it before your ship is against the edge of the screen.
Many baiters at a time
If you miss a baiter, another will soon appear. If you miss that one also, soon the baiters will be appearing very quickly. When this happens, and you have several baiters on the screen, it’s futile to try to shoot them all; new baiters will appear faster than you can try to shoot the old ones. When this is happening, it’s best to ignore the baiters and try to finish the wave as quickly as possible. If there are no opponents on the screen other than baiters, hyperspace may help by moving you closer to your opponents. The baiters, however, will know where you’ve hyperspaced to before you even appear there, so be ready to react quickly as soon as your ship reappears.
If you’re trying to shoot an opponent and there are many baiters on the screen, keep firing constantly. This, combined with the presence of so many baiters, will slow the machine down so much that it will be relatively easy to avoid the baiters. Remember, however, that some of the objects on the screen can be hypered to the edge of the radar scanner. For this reason, it isn’t a good idea to be firing constantly when bombers come onto a screen full of baiters. The bombers make a big contribution to slowing down the machine, and as the last objects to have appeared, they may be hypered right off the screen.
Baiters and mutants
The combination of a baiter and a mutant is the game of Defender’s most deadly duo. Part of the reason for this is that the moves used to shoot baiters and mutants are completely different: mutants are best shot with the quick reverse maneuver, which involves a sudden vertical jerk in your motion, while baiters are best handled by long, sweeping horizontal moves that throw them into your line of fire.
When you are faced with a mutant and one ore more baiters, try to shoot the mutant first. This frees you up horizontally, so that you can deal effectively with the baiters. There are two important things to remember in this situation: (1) the mutant will come to you, so it isn’t necessary to move towards him, which could make you vulnerable to the baiter squeeze play, and (2) the closer you stay to a baiter, the less chance that he will try to run into you.
What this means is that you should try to stay as still as possible, and let the mutant come to you. Don’t try to shoot the mutant from a distance, because your vertical strafing motion will make you a tempting target for a kamikaze baiter. Just stay still, no matter how close the baiter is, and wait for an opportunity to use the mutant quick reverse move.
Baiters and swarmers
Shooting a baiter is also very difficult in the presence of a cloud of swarmers. The safest approach is to run from the swarmers and lead the baiter into a less congested part of the planet’s air space, where there’s room to maneuver. Or, if the baiter appears while you’re in the swarmer follow position, try to shoot him without losing the follow. Be ready to reverse and abandon the follow if the baiter tries to pin you against the top or bottom of the screen.
The best way to handler the combination of baiters and swarmers is to see it coming ahead of time and avoid it. If you are approaching a cloud of swarmers, and know that a baiter is due to appear, stay away from the swarmers until the baiter beams in. By watching the radar closely, you should be able to shoot the baiter as soon as he appears. Then go straight to the swarmers and try to finish them off with the follow move before the next baiter appears. This buys you the maximum amount of baiter-free time to use on the swarmers.
Even if you wait and draw the baiter out ahead of time, you may get a baiter before you finish off a cloud of swarmers. If the last swarmer is moving at a steep angle across the screen, it’s very important to have the courage to try cheating on the follow (see Chapter 5). If you just follow the swarmer to the topic edge of the screen, the baiter will easily pin you if you don’t hit the swarmer before he wraps around.
Expect baiters
No matter how good a Defender player you become, you’re going to have baiters to deal with, in every game you play. In fact, unless you’re exceptionally quick and an accurate shot, you’ll rarely make it through a single wave without shooting one or more baiters. Consequently, you should look at baiters as an expected part of every attack wave. This is simply a matter of attitude, but its effect on your baiter-shooting success can be significant. Don’t think of the end of each wave as a race against the clock, trying to finish without a baiter. Instead, look forward to that baiter (or those baiters) as the most challenging and interesting part of each attack wave.
- About this book
- Introduction
- Chapter 1: Getting Started
- Chapter 2: The Controls
- Chapter 3: Landers
- Chapter 4: Mutants
- Chapter 5: Swarmers
- Chapter 6: Bombers
- Chapter 7: Baiters
- Chapter 8: Catching Humanoids
- Chapter 9: Free Space
- Chapter 10: Strategy
- Chapter 11: Miscellaneous
- Chapter 12: Stargate
- Chapter 13: Attitude
- Acknowledgments