Defender, Chapter 1: Getting Started

As video games go, Defender is very fast-paced and complicated. It has six different controls and two playing screens, with dozens of opponents to keep track of. For these reasons, many people claim that Defender is the most difficult video game to master. Don’t let them intimidate you. The biggest reason people find Defender difficult is that they jump into it, wanting to play and have fun right away. Defender, more than any other video game, requires that beginning players stop and think about what they’re about to do before playing that first game. Before you can enjoy Defender, you have to understand it.
The world of Defender
The game of Defender takes place in a separate world, a faraway planet with its own rules of reality and possibility. You, the player, control a small spaceship (it really looks more like a jet fighter) in this world, going wherever you please. You have a fast firing laser gun that can mow down any opponent in your path, and a supply of bombs (smart bombs they’re called) that are powerful enough to annihilate a whole fleet of enemies at once. Your only responsibility, and some players even shirk this one, is to protect the men that wander about on the planet’s surface. These men have two fears in life – that a lander might carry them away, or that you might accidentally (or intentionally) shoot them with your laser gun.
Landers are green satellites that drop out of the sky and fly along just above your planet’s terrain. When a lander finds the man he is looking for – each lander has only one man in mind – he will drop down and pick him up and carry him away to the planet’s upper atmosphere. To stop a lander engaged in this mischievous task, you can either shoot him with your laser gun or blow him away with a smart bomb (overkill, perhaps, but extremely effective).
If you see a lander carrying a man away, and shoot him while he’s still close to the planet’s surface, the man will fall safely back to the planet below. But if he has been carried far above the planet’s surface, your little friend won’t be able to survive the fall. In this case, you’ll have to shoot the lander and then catch the falling man in mid-air, by flying under him and allowing him to light on your ship If you successfully catch the falling man, he’ll hang on to the underside of your ship until you bring him back to the planet’s surface, where he will disembark.
If a lander succeeds in carrying a man away to the upper atmosphere, he will ingest the man and, combined forever, they become a mutant. Mutants are both more aggressive and more elusive than landers. They will follow your ship and fire at it, or even try to run into it, and they’re very difficult to shoot because they try to stay above or below your ship. Mutants don’t bother with the men on the planet, but you’ll want to shoot them anyway, just for being obnoxious.
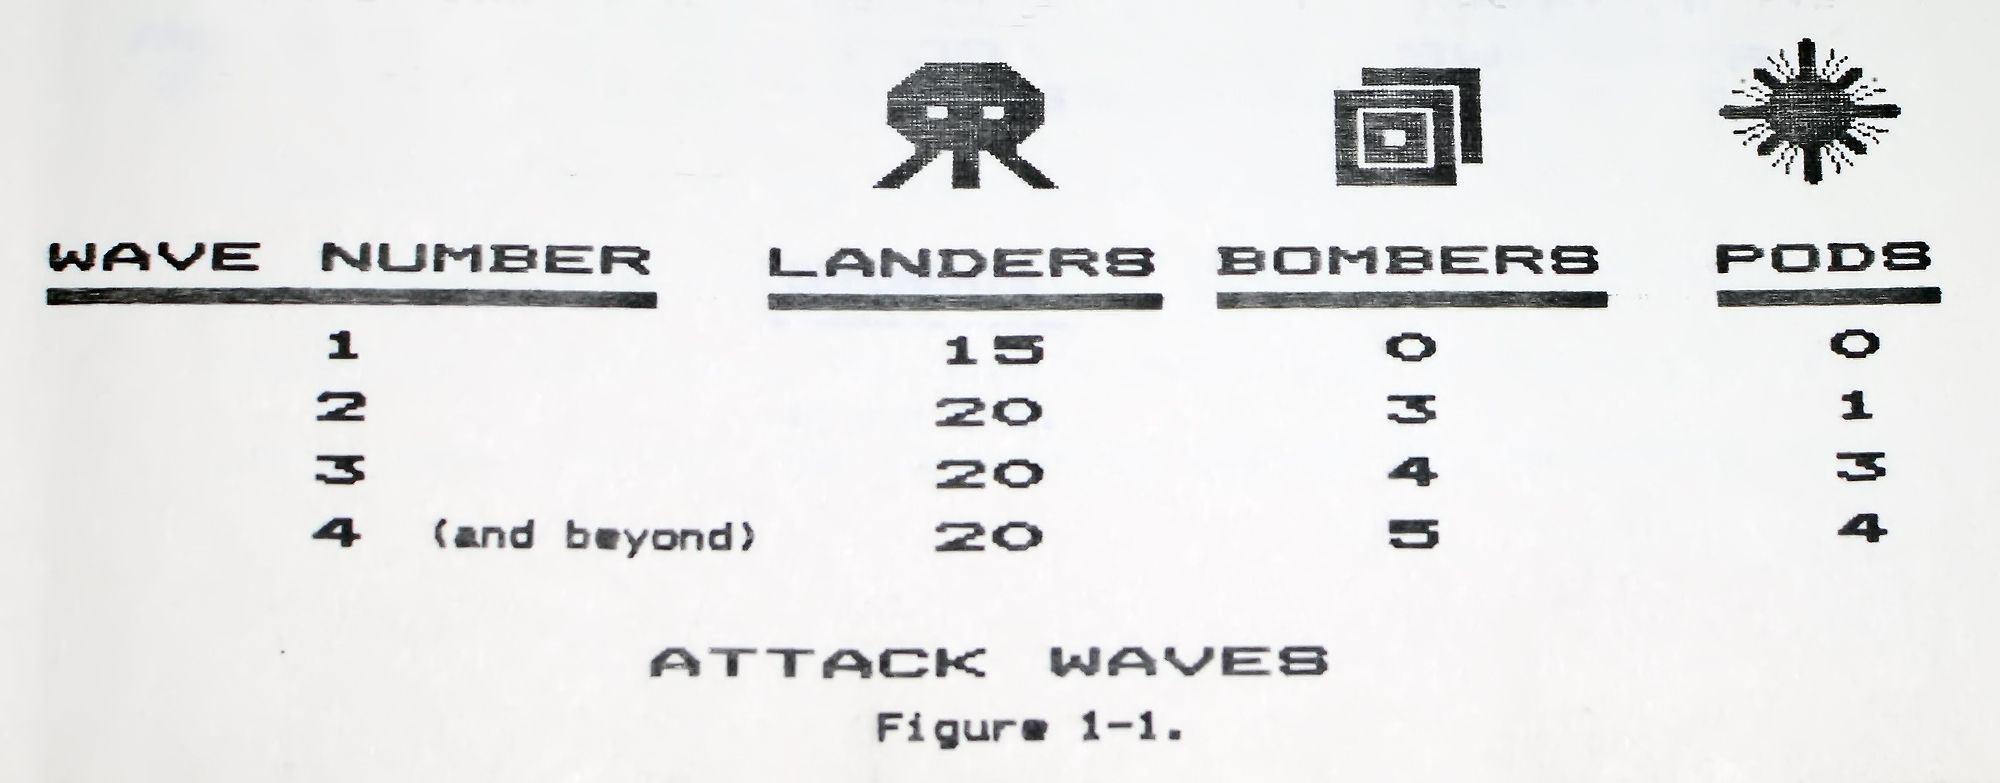
Landers come in large groups called attack waves. After an attack wave has arrived, the next attack wave doesn’t come until you destroy all of the opponents in the previous wave.
After the first attack wave, the landers start bringing help with them in the form of bombers and pods. Bombers are flashing purple squares that move across the planet’s terrain, leaving a trail of white mines that can blow up your ship on contact. Pods are large shimmering stars of red and purple that drift slowly through the atmosphere. Pods themselves won’t bother you, but if you shoot one it breaks into a group of up to seven bothersome swarmers. Swarmers are small red triangular fellows with two yellow eyes, and they like to follow your ship around, firing bullets at you and warbling like little birds.
When an attack wave begins, all of the bombers and pods, as well as the first five landers, will immediately appear around the planet. Bombers are positioned on the opposite side of the planet from your ship, pods show up right in front of you, and landers are randomly positioned anywhere on the planet. After that, the rest of the landers in the attack wave appear in groups of five until they have all arrived.
In addition to landers, mutants, bombers, pods, and swarmers, there is one more group of opponents in the game of Defender: baiters. Baiters are green flying saucers with three small circles on the side. They aren’t really part of the attack wave, but will start showing up if you take too long to finish a wave. As the only opponents that can travel faster than your spaceship, baiters are very aggressive, trying to run into your ship and firing constantly. The only good thing about baiters is that you don’t have to shoot them to finish the attack wave; if you destroy all the other opponents in a wave, you’re done and the baiter disappears.
Earlier we noted that you have only one responsibility in the world of Defender – to protect the men on your planet. You must save at least one of those ten men all of the way through the fourth attack wave. You’ll then get ten new men at the beginning of the fifth attack wave, and so on. Every five attack waves you get ten new men, and must save one ore more of them until the next ten arrive.
So what if you don’t save your men? Maybe you just want to fly around, have some fun, think only of yourself. That’s fine, but the consequences of losing all ten men are severe. When your last man is carried away, the planet’s surface shatters and is blown away by the cosmic wind. Then all of the remaining landers in the current wave spontaneously mutate, leaving you facing a sea of vicious mutants. Not only must you finish off this wave, but you’ll continue to face mutants in lieu of landers until the next ten men arrive, bringing a new planet with them.
The game of Defender
Now that you understand what you’re trying to do in Defender, it’s time to learn the rules of the game. When you first start out, you’re given three ships and three smart bombs (unless the machine you’re playing has been modified to give you more ships or bombs – three of each is the normal setting). The bombs, displayed to the right of your score, can be used to destroy all of the opponents on the screen at once. The ships, displayed just above your score on the screen, correspond to turns: one ship is lost at the end of each turn. A turn ends when your ship collides with an opponent, a mine, or an opponent’s bullet. The game is over when you lose your last ship.
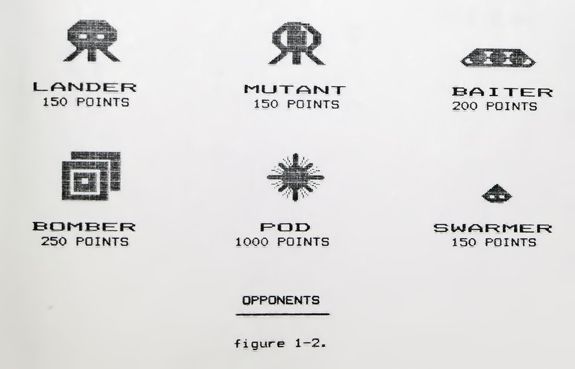
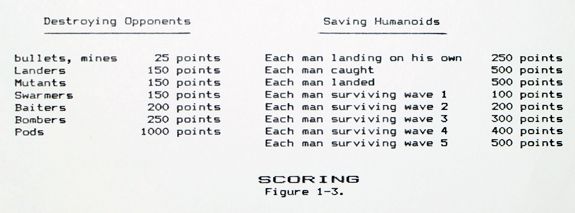
After each 10,000 points scored, you are awarded another ship (turn) and another smart bomb. To score points, you destroy opponents by shooting them, bombing them, or running into them. Points are also awarded for a man that safely falls back to the planet’s surface, a man caught in mid-air, and a man successfully landed on the planet’s surface. Bonus points are awarded at the end of each attack wave, depending on how many men survived. And you even get 25 points for running into a bullet or a mine. The value of each of these scoring possibilities is listed below.
Defender has two playing screens: a large main screen and a small radar scanner above it. The radar scanner is constantly scanning the position of opponents and humanoids everywhere on the planet, while the main screen shows what’s happening near you.
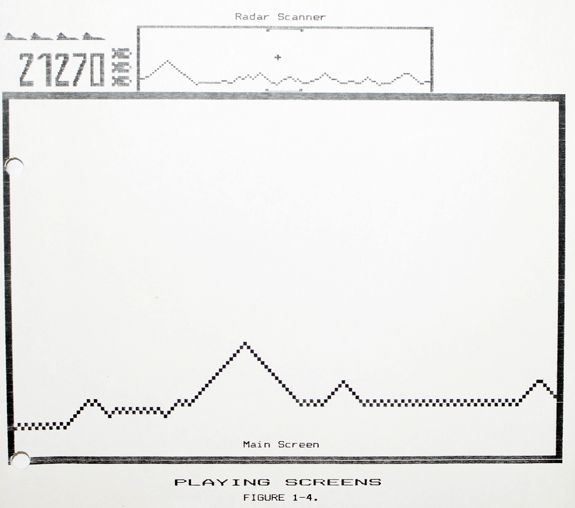
The main screen shows your ship and all nearby opponents. The outline of the planet’s terrain is shown as a jagged brown line across the lower part of this screen, and the men are shown as small white rectangles on or below the planet’s surface. All of your enemies except landers have the ability to leave the screen through the top and reappear at the bottom, or vice versa. Your ship, however, doesn’t have this ability.
The radar scanner shows all of the planet’s surface, including the areas that can’t be seen on the lower screen. All of the opponents that have arrived in the current attack wave can be seen on the radar scanner, so you can anticipate the arrival of opponents at either edge of the main screen. The section of the scanner corresponding to the main screen is delimited by white brackets above and below the scanner. Within that area, the position of your ship is represented by a small white cross.
Because the radar scanner shows things on such a small scale, your opponents’ shapes are not shown – instead, opponents show up as dots of the appropriate color: landers, mutants, and baiters are green dots, pods and bombers are purple dots, and your men are white dots. It’s possible to tell the difference between pods and bombers or landers, mutants, and baiters by slight variation in the shade of purple or green on the radar. As we’ll see later, it is important to know exactly which types of opponents are approaching on the scanner, to plan your strategy before they arrive on the main screen.
The radar scanner shows the entire circumference of the planet, so objects that move off the left edge come back on the right edge, and vice versa. The limits of the main screen are shown by white brackets above and below the radar scanner; your ship shows up as a small white X within these brackets.
The terrain displayed on the main screen and radar scanner is really the silhouette of mountain ranges. Your ship, which flies in front of those mountains, can therefore appear to fly below the planet’s surface at times, passing in front of the mountains in the background. Your ship is not affected by this; Defender is one of the few video games that allows you to fly right through geographical landmarks without injury or destruction.
Another interesting feature of the planet’s terrain in Defender is that it is always the same. That is, the same mountains are in the same places each time you play. Most of the terrain is forgettable, but there is one landmark that is very obvious: a large mountain, always positioned at the left edge of the radar scanner when you start a turn. Whenever players refer to the big mountain, that’s the one they’re talking about.
Your first game
After reading and understanding the two sections above, you’re a qualified Defender spectator. And that’s exactly what you should do, if you’ve never played before – go to the nearest Defender machine and just watch a few games. Try to recognize when the player is picking up and setting down men, when the attack waves started and end, and, most importantly, when each turn ends and why. Imagine yourself making those same maneuvers you’re watching on the screen; think about how the controls must have been used to accomplish what you see (the effect of the controls is explained in Chapter 2). If you give in to the temptation to play a game too soon, your quarter isn’t going to buy very much playing time. In fact, there is a common and frustrating experience among first-time Defender players – their game is usually over before they realize it began.
Once you feel ready to begin that first game, stuff your quarter in the slot on the front of the machine and put your hands on the controls. Move the altitude lever up and down and push the thrust and fire buttons, just to get a feel for things. After you feel comfortable with the controls, let go of the altitude lever, push the red ONE PLAYER button with your left hand, and quickly grab the altitude lever again. Take a deep breath and get ready to have some high-octane fun – your first game is successfully under way.
Accompanied by a short buzzing or chirping sound, your ship will materialize on the screen before you. At the same time the planet’s terrain will appear, as a jagged brown line across the lower half of the screen. Resting on the terrain will be one or more small white rectangles – the men who will count on you for protection. If you look up at the radar scanner you can see all ten men dotting the planet’s surface, including those that aren’t close enough to be on the main screen. For this first game, however, you won’t be looking at the radar screen very often, as there will be more than enough on the main screen to keep you busy.
About a second after your spaceship appears, five green landers will flash onto the radar screen. One or more of them may also appear on the main screen. If there are landers on the main screen, move the altitude lever up or down to align your ship with the nearest one and shoot him, by pushing the fire button on the far right. Continue to shoot the landers on the main screen until there are none left. Then move ahead slowly (by pushing the thrust button) until you see another lander, and shoot him. Keep this up until you have shot all 15 landers in the first attack wave.
Since your aim won’t be very good during your first game, try strafing the landers when you shoot them. Strafing means to move your ship up and down over a section of the screen while firing as rapidly as possible. By getting as many shots as possible in the area around your target, you increase your chance of hitting it.
Although your ship can fly in either direction, you should fly primarily to the right at first. One of the most common mistakes beginning players make is to turn around too often. If you miss a lander on the first wave, just keep going; you’ll have another chance to shoot him the next time around the planet. Flying back to the left to shoot a single lander allows all of the other landers more time to pick up men and turn into mutants, so just keep moving to the right and shooting the landers in front of you.
The only time to be looking up at the radar scanner during the first wave is after you have destroyed nearly all of the landers and there are none on the main screen. Then look at the radar scanner to determine which way you should fly to get the remaining landers. At all other times, especially while you’re moving, keep your eyes on the main screen so that you can dodge the landers and their bullets. Eventually, of course, you’ll have to develop the ability to keep track of what’s happening on both screens. But this ability won’t be developed in your first game, so don’t confuse yourself by trying to use it.
Rescuing a man that is being kidnapped by a lander is very difficult for beginners. At first, it’s better to just shoot the lander and not worry about the man; either he’ll survive the fall or he won’t – and anyway, that’s his problem. Your biggest concern in this first game should be staying alive, rather than protecting the men. Few players survive long enough in their first game to see the loss of all ten men, so saving men isn’t very important at this stage.
If you concentrate on just shooting all of the landers, you may finish the first attack wave in your very first game. If you do, congratulations – you’re off to a better start than most players. The following tips will be helpful when you start getting to the second, third, or fourth attack wave, regardless of whether it’s your first or fiftieth game.
During the first four attack waves, shooting the landers should be your number one priority. Shooting the landers quickly prevents them from picking up men and turning into mutants, which are much more difficult to shoot than landers. While shooting landers, keep moving around the planet. If you stay in one area too long, landers will have free reign of the rest of the planet, picking up all the men there.
Mutants will be difficult to shoot at first. Try to shoot them from a distance if possible, because they can pin your ship against the top or bottom of the screen if you let them get too close. Later on, in Chapter 4, we will look at some easier ways to shoot mutants, but you’ll need to improve your flying skills before those maneuvers can be used effectively.
Starting with the second wave, you’ll have pods and swarmers to deal with. Swarmers will be hard to handle at first, so you may have to use a smart bomb on them. On the second wave, shoot the pod before bombing, because sometimes swarmers will survive if you just bomb the pod. On the third and higher waves, just bomb the pods that appear in front of your ship at the start of the wave right away. (For reasons that will be explained later, it doesn’t pay to shoot pods before bombing them when you have more than one on the screen.)
Bombers are part of the second wave and each wave thereafter. They don’t move very fast, but you have to watch closely for the small white mines they leave behind, since running into one of those mines will blow up your ship. Try to shoot bombers from the front, where there are no mines. If you’re following a bomber, go around a safe distance above or below it before trying to shoot it.
In addition to shooting, or fleeing from, your opponents, you need to keep track of the men on the planet’s terrain. If you lose all of them and go into free space, you’ll be in over your head and the game will end fast. Therefore, if you see your last man going up on the radar and you can’t get there in time to save him, just run into something. You’ll lose a ship for this, but, until you’ve read and understood Chapter 9, free space will always cost you at least one ship – more likely, it will cost however many you have left to give.
When the Defender machine is very busy generating opponents and explosions on the screen, or making your ship and shots move quickly, the game will begin to slow down; the effect of the controls can be delayed slightly, and your shots and opponents move more slowly. So, to prevent the game from grinding to a halt when there’s a lot going on, opponents are sometimes hypered away. If the machine senses that it is beginning to slow down, it takes the most recent opponent to appear on the main screen and moves (hypers) him to the far edge of the planet. When this happens, you’ll think the opponent has disappeared for good, only to find him again on the far side of the planet.
Once you start getting to the third and fourth attack waves regularly, you might start to get some recognition – if your score is one of the top eight for the day, you can enter your initials in the Defender Hall of Fame that flashes on the screen between games. If your score is one of the eight best, you’ll get a congratulatory message on the screen after the game, asking you to select your initials. The altitude lever is used to move through the alphabet, and the fire button is used to select a letter.
About a month after I started playing Defender, I began paying close attention to the high score on each machine that I played, because I was getting on the list sometimes and wanted to know who I was competing with. I noticed that someone with the initials DRJ played the same machine I did every day, and scored around 20,000 points each time. I was impressed with DRJ’s consistency, and also by the fact that he seemed to play very early in the morning; no matter how early I would show up to play, DRJ had already been there. I also noticed that DRJ occasionally played another Defender machine that I did, many miles from the first one. After weeks of curiosity about the mysterious DRJ (who, I had noticed by then, always scored exactly 21,270 points), I finally realized who he was: DRJ is the preset high score for the day when a Defender machine is turned on. Almost a year later, I found out the true identity of DRJ. Defender’s inventor, Eugene Jarvis, included his own nickname, “DR. J.”, as the preset high score on every Defender machine made. Consequently, he and his friends, whose initials make up the rest of the preset list, make the Hall of Fame on 50,000 Defender machines around the world every day.
If you’re wondering whether a particular score is a preset or not, to know whether you’re competing with real people, look at the last two digits of the score – the preset scores all end in impossible combinations of digits. All of the scoring possibilities in Defender are multiples of 25 points, so a real score always ends in 00, 25, 50, or 75, while a preset score never does.
- About this book
- Introduction
- Chapter 1: Getting Started
- Chapter 2: The Controls
- Chapter 3: Landers
- Chapter 4: Mutants
- Chapter 5: Swarmers
- Chapter 6: Bombers
- Chapter 7: Baiters
- Chapter 8: Catching Humanoids
- Chapter 9: Free Space
- Chapter 10: Strategy
- Chapter 11: Miscellaneous
- Chapter 12: Stargate
- Chapter 13: Attitude
- Acknowledgments