Defender, Chapter 4: Mutants

When a lander carries a humanoid all the way to the top of the screen, the two combine and become a mutant. Mutants look very much like landers, but there is a big difference in their behavior – the easygoing, carefree lander that just seconds before was content to cruise aimlessly along the planet’s surface is transformed into an erratic kamikaze. Like swarmers and baiters, mutants are truly aggressive. And, like swarmers and baiters, the best way to handle a mutant is to let his aggressive behavior bring him into your line of fire, rather than chase him all over the screen. The first step in learning to deal with mutants, then, is to examine how they behave.
If you watch a novice player for a while, you may notice the following sequence of events when he or she encounters a mutant. First the player will fire a few shots at the mutant, which is approaching rapidly – these shots usually miss, because the mutant is constantly jumping above or below the line of fire.
Eventually the mutant will reach a point above or below the player’s ship. If the player slows down, wondering what to do next, the mutant will begin moving vertically towards the ship. Because of the mutant’s position relative to the ship, he cannot be shot by the player. If the player continues moving forward, the mutant will drop in and follow close behind, just above or below the ship’s altitude. If the player stops, the mutant will overtake the ship and run into it. If the player accelerates away, the mutant will suddenly back off towards the top or bottom of the screen.
If our exemplary novice is lucky enough to survive all of this, he usually pulls away from the trailing mutant, turns around, and repeats the whole show in reverse. This awkward and hopeless scenario is an excellent example of how mutants react to your behavior, and it gives us some clues about how to shoot them.
The most important thing that we can learn from our novice’s dilemma is that a mutant tends to avoid your line of fire. By his constantly quivering motion, a mutant can approach without ever giving you a good shot at him. And although mutants are constantly trying to run into you, they want to do it from directly above and below. A mutant will move vertically towards your ship only after he reaches a point above or below it. This keeps him safely out of your line of fire – or so he thinks. In the next section, we’ll take advantage of the mutants’ simpleminded strategy.
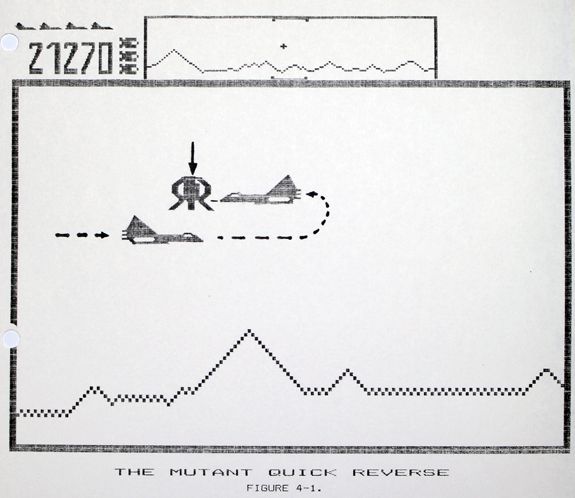
The quick reverse
The safest way to shoot a mutant is to use a maneuver called the mutant quick reverse. This move can be performed from above or below a mutant, while heading in either direction, but for an example let’s assume that you’re flying to the right and the mutant is above your ship to the right.
Fly towards a point just below the mutant, and let off the thrust as you approach him. As soon as you’re close enough to satisfy him, the mutant will drop down towards your ship. At this point he’s out of your line of fire, but don’t panic; you’ll have an easy shot sooner than you think. While the mutant is moving down towards your ship, accelerate enough to stay ahead of him. If you apply just enough thrust to stay in front of the mutant, he’ll continue to drop down until he’s almost directly behind your ship. At this point, hit the reverse and push up on the altitude lever. If you’ve timed everything correctly, the foolish mutant will probably fall to your first shot. With just a little practice, you’ll be able to time your shot so that you only need to fire once.
The mutant can run into you from above if you turn around too soon, so you must have patience for this maneuver. If you have the patience to wait until the mutant is directly above your ship’s rocket flames before reversing, your first shot will almost never miss.
To preserve forward momentum and save time, you should reverse again after shooting the mutant and accelerate, without ever coming to a stop. This also prevents a collision if you completely missed the mutant; he will pull in behind you and you can try the maneuver again. Eventually, after you’re comfortable with the quick reverse, you’ll be able to use it on mutants that approach from behind, by slowing down and waiting for them to fall in behind you.
Quick reversing on a group of mutants
The quick reverse will work on more than one mutant at a time, if they are all very close together. When you reverse and fire, just stay reversed and keep firing until you get them all. Never apply the thrust when reversing on a group until either all of the mutants are destroyed or you have reversed again and are pulling away from them. Thrusting into a cluster of mutants can be dangerous; if you get between two mutants, their jumping motion will pin your ship from above and below.
The southpaw reverse
Once you have mastered the mutant quick reverse, practice performing it backwards (while moving to the left). Nearly all players are less effective with the quick reverse when moving to the left, but the only reason for this is a lack of practice. Don’t get into the habit of favoring your good side by manipulating mutants so that you can always reverse on them while traveling to the right. This limits your game, particularly in free space.
Playing the edge
Sometimes a mutant shows up in a position where the quick reverse cannot be used. For example, you might be carrying a humanoid and an approaching mutant is below the planet’s surface; if you try the quick reverse at that low altitude, you’ll shoot the man you’re carrying. In this situation, remember that the mutant sees the screen as a continuous surface, with top and bottom edges connected. If you quickly pull up above the center of the screen while a mutant is near the bottom edge, he’ll wrap around and come through the top because that is the shortest path to your ship. Keeping this in mind, you can pull mutants through the top of the screen and deal with them out in the open, where there is no chance of accidentally shooting humanoids. By anticipating the mutant’s appearance at the top edge of the screen, you can shoot him head-on the moment he appears. Just get to the top quickly, and be firing before he appears – the mutant will have to cross your line of fire as he hops onto the screen.
Strafing mutants
When more than two or three mutants are spread out over the screen at one time, the quick reverse is not practical because one mutant can pin your ship against the edge of the screen while you are reversing on another. The best thing to do here is to try to cut the crowd down to a manageable size by repeated strafing runs from either direction. Even if you don’t hit a single one, passing through the mutants compresses them, and after a few passes they may be clustered together enough to fall for a quick reverse or even a smart bomb, which mutants always fall for.
One thing to remember when strafing mutants is that the closer they are, the less chance that a random hop could pull one out of your line of fire. By waiting near the top of the screen until the entire group of mutants is on the screen and then pulling down and forward while firing as fast as possible, you will have a better chance of shooting them than if you start moving downward before they are on the screen. Try to come as close as possible to the first mutant in the cluster without running into him.
Bombing mutants
For more than ten mutants at a time (in free space), most players should use a smart bomb. If the mutants are spread out over more than one screen width, all you have to do is pass through all of them once or twice to compress them onto a single screen. In this case, don’t worry much about shooting them, since they’ll be blown into oblivion shortly anyway – just make sure you survive each pass.
On the pass where you use the bomb, only fly about half way through the mutants. Then turn around and hit the smart bomb. Wait as long as possible before bombing, so that all of the mutants can come onto the screen. The reason for the reverse is to avoid the mutants’ bullets, which are not destroyed by the smart bomb.
It’s safest to hit the reverse before the bomb goes off, rather than after it. If you reverse immediately after the bomb goes off, the machine may not be monitoring the reverse button because it is busy generating the explosions on the screen, and nothing will happen.
Compressing a group of mutants
Several places in this chapter, I have mentioned the concept of compressing a group of mutants by passing through them. Any time you pass through a large group of mutants, the mutants will occupy a smaller space after you pass through them than they did before. This is because all of the mutants are moving horizontally toward your ship while it passes through them. When you’re passing through the center of the group, the mutants in back are moving forward while the mutants in front are moving backwards, and this brings them all closer together. Eventually, after enough passes, the mutants will be compressed into a single vertical wall that moves in unison. The safest way to pass through this tight cluster is to wait at the top of the screen until there is an opening in the wall at the bottom (because the mutants at the bottom edge will have wrapped around towards you), and then strafe downward to pass through the opening.
When you fly through all of the mutants they will be firing constantly, with most of the shots leading your ship. After you’ve passed through them all, there can be dozens of bullets on the screen, all traveling at different angles and keeping up with your ship. Usually the only way to avoid these shots is to slow down and let them coast on by. In order to be consistently successful with this maneuver, you must develop the ability to watch for an opening forming behind you and then drop back into it. There is almost always an opening somewhere, but you don’t get much time to look for it. If the opening is very far back, you’ll have to use the power brake to get to it.
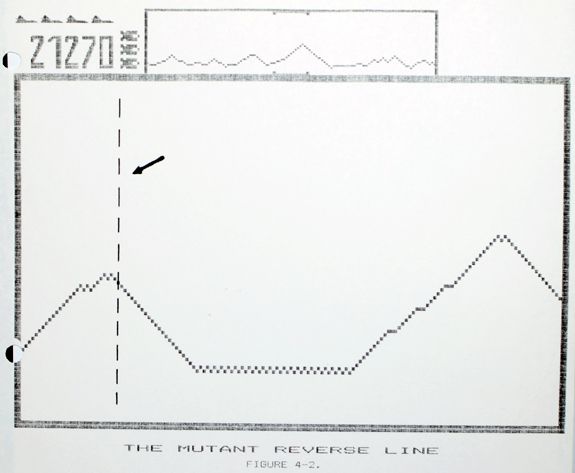
The reverse line
When your ship first appears, notice where the left edge of the radar screen is located in the terrain. This point (the first small peak to the left of the big mountain) has special significance for mutants – they can’t see through it. If a mutant is following you and your ship passes through this invisible barrier, the mutant will turn around and go all the way around the planet to get to you. This quirk in the mutants’ behavior can be used for many things, like getting rid of mutants when a baiter is about to appear. The mutant reverse line is particularly useful in free space, as we shall see later. For now, just be aware of its location and effect.
- About this book
- Introduction
- Chapter 1: Getting Started
- Chapter 2: The Controls
- Chapter 3: Landers
- Chapter 4: Mutants
- Chapter 5: Swarmers
- Chapter 6: Bombers
- Chapter 7: Baiters
- Chapter 8: Catching Humanoids
- Chapter 9: Free Space
- Chapter 10: Strategy
- Chapter 11: Miscellaneous
- Chapter 12: Stargate
- Chapter 13: Attitude
- Acknowledgments