Defender, Chapter 5: Swarmers

After you’ve learned how to handle mutants, swarmers will seem almost passive. True, a cloud of swarmers can rain an impressive volley of shots on the hapless player that gets caught in front of them, but this rarely happens to players who know the swarmer follow move. This move, made possible by a small oversight in the design of the game, is one of the simplest, safest, and most effective maneuvers in the game of Defender. Compared to the precise timing required by the mutant quick reverse, the swarmer follow move is generously forgiving of sloppy execution. Before discussing the swarmer follow move, however, let’s take a look at how swarmers behave, and the most obvious way to shoot them.
Aerial dogfight
Swarmers, as their name implies, like to travel in groups. When a group of swarmers comes on to the screen, they will all move across your line of fire in a crossing pattern, firing a steady stream of shots and warbling softly (most players agree that if there is a single sound in Defender that isn’t obnoxious, it’s the sound of swarmers firing). Shortly after passing your ship, the swarmers reverse and repeat the maneuver. By turning back into the group each time this happens, you can carry on an aerial dogfight, shooting a few swarmers on each pass.
There are two different was to shoot the swarmers when you pass through them. For a large cloud of swarmers, move vertically across the screen as the pass, and fire constantly. If there are only a few swarmers approaching, it is more effective to limit your vertical motion by moving rapidly up and down over a small area. This will draw the swarmers into your line of fire.
The aerial dogfight is an important tactic to master. Because it takes place over a small area, it is useful for shooting swarmers when you want to stay in one place (like over your last man). But if you’re free to move around, the swarmer follow move is safer and quicker.
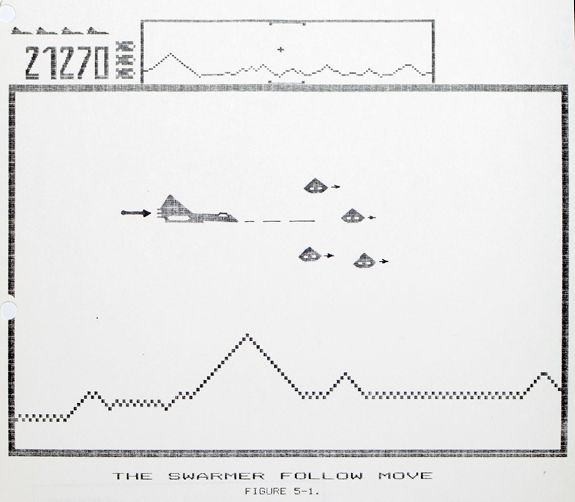
The follow move
The swarmer follow move takes advantage of the fact that swarmers won’t turn around after passing your ship until they are a certain distance away (about half the width of the main screen). To execute the follow move, fly through the swarmers and turn around immediately after passing them. Then follow the group, staying less than half a screen width away. From this position, you can shoot swarmers at will – they can’t shoot backwards, and they won’t turn on you as long as you stay close and keep moving.
The most common problem beginning players have with the swarmer follow move is letting the swarmers get too far away at the very start. Usually this happens because the ship comes to a stop for a while when turning around. To prevent this, hold the thrust down from the moment you reverse until you are gaining on the swarmers.
When you’re following a swarmer, you have delayed control over its motion – the swarmer will follow your vertical motion, but always seem to lag a bit. As if he’s connection to your ship with a rubber band. With a little practice, you’ll be able to time your motion and firing so that the swarmers are pulled through your line of fire. Until then, fire as rapidly as possible while following swarmers and move up and down overt a small part of the screen.
The only time you should have trouble using the swarmer follow move is when there are very many (say, 15 or more) swarmers in a group. In a big group, the first ones on the screen will have turned back on you before you can get in behind the whole group to follow them. Also, when too many swarmers come onto the screen at one time some of them will hyper to the far edge of the radar screen. When this happens, cut the group down to a manageable size by using the aerial dogfight approach described earlier.
Maintaining the follow
It’s pretty easy to shoot landers while following swarmers (without losing the follow), so try to capitalize on this opportunity whenever you see it. Once you’re in the swarmer follow position, ignore the swarmers until you get a chance to shoot them – they’ll still be right in front of you when you get around to it. The important thing is to be so comfortable with the follow move that you can concentrate on shooting other opponents without losing it.
It’s even possible to do the mutant quick reverse and swarmer follow move at the same time. Just pull as far forward as possible before reversing on the mutant, so the swarmers do get too far away while you’re coasting backwards.
Starting the follow without reversing
When a cloud of swarmers comes onto the screen behind you, it isn’t always necessary to turn around and confront them. Before panicking and reversing, concentrate on the swarmers’ bullets and look for a way to avoid them without reversing. If you see a way through the bullets, line up with it and release the thrust, so that the swarmers coast on by. Then, as soon as they pass you, put on the thrust and start the follow move. This maneuver will invariably convince skeptical spectators that you’re just plain lucky.
Cheating on the follow
Sometimes the last swarmer in a followed group is difficult to hit because he is flying at a steep angle, passing through the top and bottom edges of the screen. Or a baiter or mutant may be blocking your path up and down to align with a swarmer being followed. In these cases, cheating on the follow is effective.
Cheating means to accelerate past the swarmer and shoot him from the front. Because this brings your ship through the swarmer’s line of fire, it is more difficult than the basic follow move. It’s usually best to pass the swarmer on the side he is moving towards so that his vertical motion combines with yours to align the shot more quickly. Also, for a reason explained in the next section, should not move very far in front of the swarmer while lining up your shot. Cheating is one of the few moves I recommend where you intentionally move from a relatively safe position to a dangerous one, but it’s the only way out of some situations.
One other situation where cheating is useful is when a swarmer is trailing a cloud of approaching swarmers. If the trailing swarmer is too far behind the rest, you won’t be able to use the swarmer follow move on your first pass, because some of the swarmers will have turned around by the time you get in behind the trailing one. Although passing through the swarmers will usually compress them enough to allow you to use the follow move, that extra pass wastes time and can bring out an unnecessary baiter.
A quicker way to handle the situation is to pass the main cloud of swarmers and then turn to follow them immediately, in front of the last swarmer. This puts you in the cheating position relative to the last swarmer, and the follow position relative to the rest. Shoot the trailing swarmer quickly, while maintaining the follow on the others.
Swarmers' shooting
When a swarmer fires at your ship, he never knows how far away you are. He just checks your altitude, and then fires at a point about ¼ screen in front of him at that altitude. When a cloud of swarmers is firing at you, all of their shots pass through that point. Because they don’t know exactly where your ship is, you’re actually safer when you’re closer to the swarmers than the focal point. When you’re flying into an approaching cloud of swarmers, then, concentrate on their shots only until you pass the focal point. After you pass it, concentrate on the swarmers themselves, who will be more likely to run into you than shoot at you.
Breaking pods
Starting with wave 3, you should always use a smart bomb on the pods at the beginning of the wave. Sometimes the pods will be slightly ahead of your ship, and you’ll need to move ahead in order to get them all on the screen. If this is the case, slow down before bombing (by power braking, if necessary) so that there will be less chance of swarmers surviving the bomb by being left behind while you’re moving. The only exception to this procedure is when the pods are spread out over slightly more than one screen width. In that case, you can sometimes get all four pods with the bomb by timing the smart bomb so that it goes off just as the pod farthest to the left is leaving the screen; the smart bomb’s blast will be slurred by your forward motion to cover the pod that is not yet on the screen.
If the position of the pods at the start of the wave will not allow you to get them with one bomb, you should still bomb as many as possible. Even just two pods are worth using a smart bomb. If you do only get two pods with the bomb, watch for an opportunity to bomb the other two just to the right of the big mountain; if the missed pods are hypered there, all of the bombers will be on the screen with them. And two pods with all five bombers is definitely worth a bomb.
Another good trick when pods are very spread out is to shoot the one farthest to the left and then follow the swarmers into the remaining pods. Hit the bomb when all the swarmers and pods are on the screen, and you may end up with no swarmers at all. At the very least, you can be sure that you’ve broken all the pods.
Regardless of how you bomb the pods, you’ll occasionally miss one or more of them with the bomb. These leftover pods, which are usually hypered to the far edge of the scanner, should be shot when you pass them. This gives you the opportunity to shoot the swarmers while finishing off the rest of the wave, and, as explained in Chapter 7, it prevents baiters from coming out so quickly. When shooting these pods, or any pod, don’t use just one shot. Fire as rapidly as possible into the center of the pod, and strafe up and down slightly. This will destroy many of the swarmers as soon as they appear; if you’re fast, and a little lucky, you might get all of them.
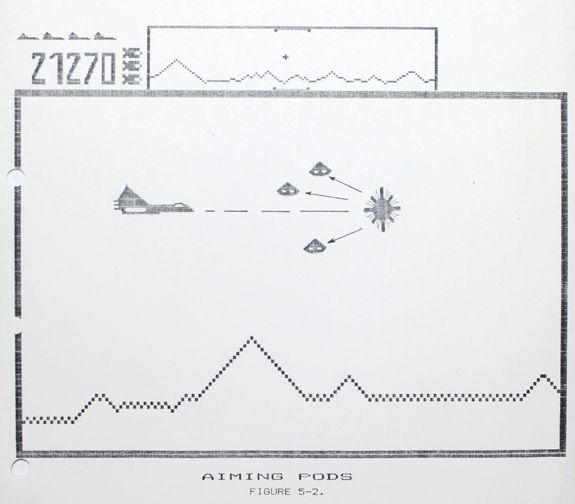
Aiming pods
After you’ve become proficient with the swarmer follow move, always aim the swarmers in the direction you want to go when breaking the pod. Aiming means to use the swarmers’ first movement (toward your ship) to your advantage. For example, if the only things left in a wave are a pod and a lander to the right of it, shoot the pod from the right. When the swarmers come past you, reverse and follow them to the lander.
When you’re flying to the right and a pod comes onto the screen, it’s possible to aim it to the right and pull into the follow move without even stopping. Fly past the pod and shoot it to the left while coasting backwards. Then, as the swarmers come towards you (to the right), let them go by and pull into the follow position. This allows you to break a pod and begin following the swarmers without breaking the continuity of the wave.
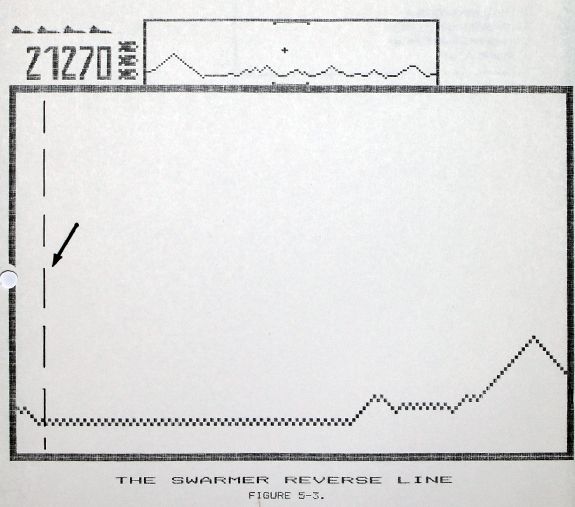
The swarmer reverse line
Earlier we noted that there is an invisible barrier on the screen that mutants won’t follow you through. The same kind of barrier exists for swarmers, but in a different location. The swarmer reverse line is just to the left of your ship when it appears at the beginning of a turn. Like the mutant reverse line, the most important thing about the swarmer reverse line is to be aware of its location and effect. There are, however, a few good tricks that the swarmer reverse line can be used for.
If a pod is located right next to the barrier, shoot it from the opposite side of the barrier while moving forward. When the pod breaks up, the swarmers will begin moving away from you because they can’t see though the barrier. If you can pass through the barrier before any of swarmers is half a screen away, you’ll already be in the follow position. The nice thing about this move is that you can just shoot a pod and keep moving, without worrying about the swarmers coming towards you. This situation pops up fairly often, because the pods are initially positioned just to the right of the swarmer reverse line.
Another good use for the swarmer reverse line is getting rid of swarmers when breaking a pod, usually done while you’re protecting your last man near the reverse line. If the pod is on the same side of the reverse line as your last man, break the pod from between it and the reverse line. When the swarmers come toward you, turn and follow them to the reverse line. Be careful not to cross the reverse line yourself, but let all of the swarmers go across it. They’ll blindly keep moving away from you, because they can’t see back through the reverse line. If the pod is on the opposite side of the reverse line from your last man, it’s even easier: just shoot the pod from across the reverse line, and the swarmers will fly away from you.
When waiting for a lander to pick up your last man near the swarmer reverse line, use the reverse line to keep swarmers on the screen when a man is going up. Wait on the opposite side of the reverse line from the swarmers, and they’ll go all of the way around the planet to get to you. If they start getting close behind you and a lander hasn’t picked up the man yet, move to the other side of the reverse line and they’ll turn around and take a lap in the other direction.
- About this book
- Introduction
- Chapter 1: Getting Started
- Chapter 2: The Controls
- Chapter 3: Landers
- Chapter 4: Mutants
- Chapter 5: Swarmers
- Chapter 6: Bombers
- Chapter 7: Baiters
- Chapter 8: Catching Humanoids
- Chapter 9: Free Space
- Chapter 10: Strategy
- Chapter 11: Miscellaneous
- Chapter 12: Stargate
- Chapter 13: Attitude
- Acknowledgments